Overview – Creating Docker images with Github Actions
This tutorial explains how to build Docker images using Github Actions. Github Actions are workflows executed based on triggers. For example, you can trigger your test suite when new code is added. Trigger a deployment when your tests pass. If it can be automated, you can do it with Actions. Building a Docker image automatically is an important step in building a CI/CD pipeline for your Docker workloads.
Steps to Create Docker images with Github Actions
What you need to get started
Step 1 – Create a Github repository
Before getting started you need a Github repository. Log into Github and start a new project or go to the new repository page. For example I am creating a new repository called nginx-docker-github-actions. Additionally my repo is public so you can use it as a reference.
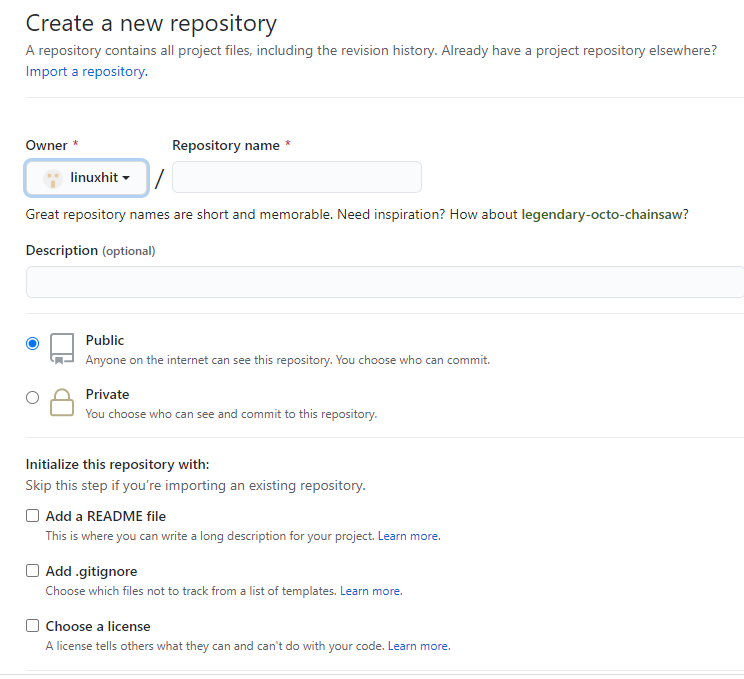
If you are familiar with using git from the command line they you can clone this repository to your computer. If not you can perform your commits through the Github web interface. For the sake of simplicity we will use the web interface in this tutorial.
Step 2 – Commit a Dockerfile to your Github repository
Next we will create a Dockerfile. A Dockerfile is the build manifest or recipe for a Docker container image. It’s contents include the base image we will start with and commands to modify the image to suite our needs. Create a text file called Dockerfile with the following contents:
# Basic nginx dockerfile starting with Ubuntu 20.04
FROM ubuntu:20.04
RUN apt-get -y update
RUN apt-get -y install nginx
Lets walk through the contents of the Dockerfile.
- The first line is a comment describing what my intention for this Dockerfile.
- FROM tells Docker which image I want to base this image on. I am using the 20.04 version of Ubuntu from Dockerhub.
- RUN tells Docker to execute commands inside container image it is building. In this case I am using the apt-get command to update the cache of available packages. Finally we install the NGINX package.
- In summary, this Dockerfile takes the base Ubuntu Docker image and installs the NGINX package on top of it.
Now put the contents of the Dockerfile into the root of your Github repository. You can do this by using the add file button on your repositories main page.
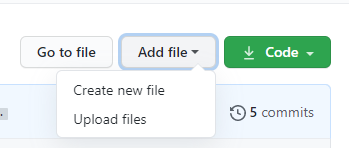
If you choose “create new file” you will be provided with an editor. Just copy and paste the Dockerfile contents and save the commit. Otherwise you can choose “Upload files” and upload the Dockerfile from your computer.
Now that we have the Dockerfile in our repository we need to setup an action workflow.
Step 3 – Select a Github action workflow
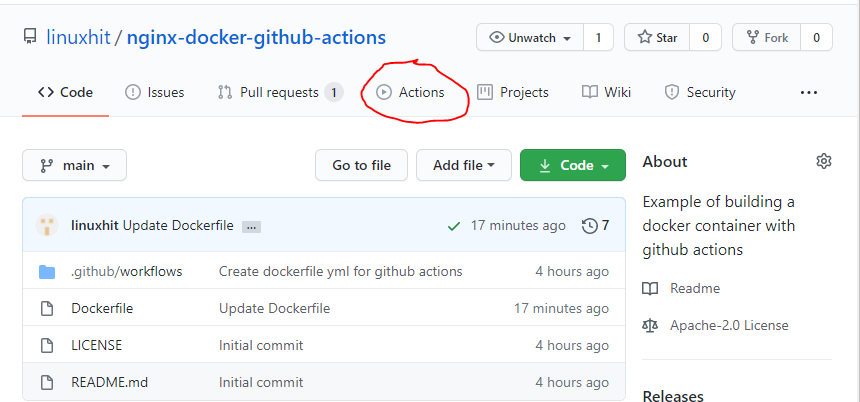
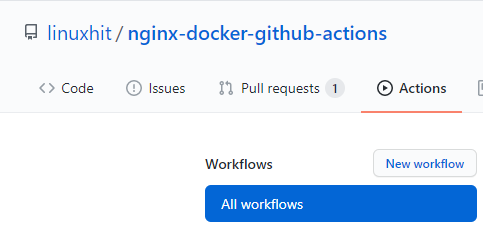
Go to the main page for your repository. Click on the Actions tab. In the Actions tab click new workflow.
You will be presented with suggestions for workflows. Because we have a Dockerfile in our repo the Docker workflows will be displayed prominently. We choose the “Docker image” workflow which can be seen in the right of my screenshot below. Click the “Set up this workflow” button.

Step 4 – Save your new Github action workflow
Now you should see a editor with a new file created. This file contains the information that drives the Github action. Click the “start commit” button to save this file. You will be prompted for commit message. The commit message will go in your repository changelog. Make it informative so you can remember why you made this change later on.
Note the location of the file .github/workflows. This new directory created in our repository stores our actions.

Before going on to the next step, let’s explore the contents of the file.
name: Docker Image CI

on:
  push:
    branches: [ main ]
  pull_request:
    branches: [ main ]

jobs:

  build:

    runs-on: ubuntu-latest

    steps:
    - uses: actions/checkout@v2
    - name: Build the Docker image
      run: docker build . --file Dockerfile --tag my-image-name:$(date +%s)
- The “name” field is a name for our action.
- In the “on” section we specify which events will trigger this action. The branches sub contains the name of the branches the events must occur on to trigger the action. We have not changed branches. Hence all of our work is on main. If you create a new branch and want to trigger this action you will need to change this section to reflect that.
- In the “jobs”->”build” section you will see a “runs-on” field set to ubuntu-latest. This specifies the type of Github servers our job will run on. This is not the version of our Docker image. Our base Docker image is driven the Dockerfile. This is the underlying infrastructure that will run our Docker job. For example in this case our Docker image will be based on Ubuntu 20.04 but the Docker image build will happen on Github servers running ubuntu-latest.
- Next are the action steps. The “uses” field tells the workflow to checkout our repository. The “name” field is the name of our step. And finally “run” specifies the command to run.
We are now ready for our first build!
Step 5 – Make a change and trigger a Docker image build
To trigger a build we must make a change to our main branch. Make a simple comment change to the Dockerfile so it looks like this:
# Add a new comment to trigger build.
# basic nginx dockerfile starting with Ubuntu 20.04
FROM ubuntu:20.04
RUN apt-get -y update
RUN apt-get -y install nginx
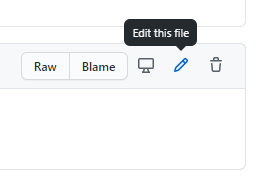
The easiest way to do this is through the Github web interface. Go to your repository page and click on the docker file. Next use the edit this file button. Make the change and commit to the main branch. Alternatively if you are a fluent git user, user the command line tool to commit the change.
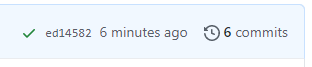
Github will detect the change to your repo and kick off a new build. You should see an indicator that the build is kicked off. Here is an example of my repo 38 seconds after I made the change.

The status indicator uses colors to indicate your build status. The green check mark indicates success, yellow circle indicates in-progress and a red circle indicates failure.
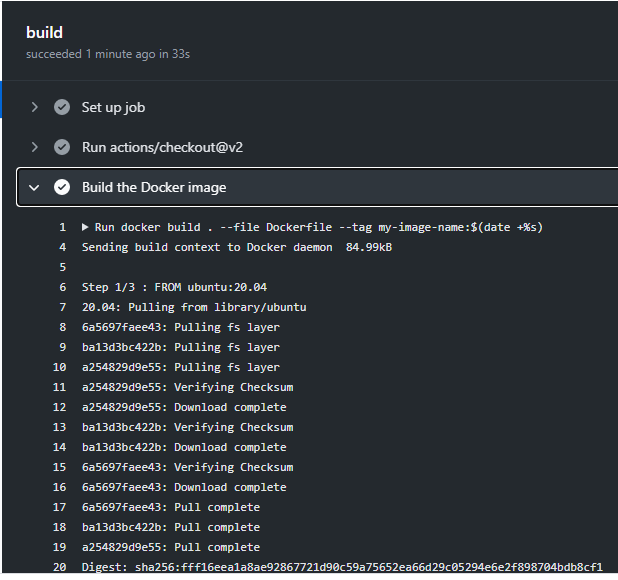
To see your build logs click on the indicator. It takes you to the page for that build. From there you can drill down into the steps and logs for each step. Additionally you will get emails when the build fails and can easily configure your alerting in Github.
You are now building Docker images automatically on Github. The logical next step is to publish your container image to a Docker registry. I suggest the Docker publish workflow for this. If you would like to see a tutorial for the Docker publish workflow please leave a comment with your feedback.
Conclusion
Creating a Docker image for each repository change is a small step in the CI/CD progression. From here you can consider publishing images to Docker repository and deploying your Docker images on to actual infrastructure.
Reference Links
- My example Github repository.
- Github Actions Publish Docker workflow.
- Github Actions documentation.
Related Articles
- Check all of our Docker articles.
Excellent tutorial, simple and too the point, everything else I found was confusing.
A follow-up article showing how to publish it to Githubs docker registry would be awesome!