What does this Raspberry Pi PXE Boot tutorial cover?
This Raspberry Pi PXE Boot tutorial walks you through netbooting a Raspberry Pi 4 without an SD card. We use another Raspberry Pi 4 with an SD card as the netboot server. Allocate 90-120 minute for completing this tutorial end to end. It can faster if you already familiar with some of the material.
- What does this Raspberry Pi PXE Boot tutorial cover?
- Why I wrote this tutorial
- Why PXE boot or netboot a Raspberry Pi?
- What is PXE, How does it work?
- Inventory
- Assumptions
- Phase 1 – PXE Boot Client Configuration
- Phase 2 – Raspberry Pi PXE Boot Server Configuration
- Complete. Does it work?
- Raspberry Pi PXE Troubleshooting Guide
- Room for improvement
- Feedback
- Donations and Tips
- Credits
- Update Log
Why I wrote this tutorial
Does the world need another Raspberry Pi PXE boot tutorial? I read many amazing docs, forum posts and blog posts on the topic before starting this project. However they all have some gaps I filled in myself. So I decided to write a tutorial that addresses the following gaps.
- Most are geared to Pi 3s. Understandable since the Pi 4 is newer. However there are subtle differences between PXE booting the Pi 3 and Pi4. This tutorial focuses on Pi 4.
- Glossing over the underlying technologies assuming knowledge of PXE boot. I aim to provide more insight into the PXE boot process.
- Troubleshooting tips tended to be lacking. I provide a troubleshooting guide in this how to.
Why PXE boot or netboot a Raspberry Pi?
I am embarking on an IOT project using Raspberry Pis in a Kubernetes cluster. 10 Pis will be in the cluster for running containerized workloads. I want to make provisioning and re-provisioning the cluster nodes easy as pie (pun intended). As a result of this my first stage of the project is figuring out how to PXE boot the Raspberry Pi 4. Which led me to creating this tutorial.
My goals are:
- Simplify Pi provisioning and maintenance as much as possible.
- Automate updates/upgrades as much as possible.
Netbooting is a good path to achieve these. For example, when you netboot a Pi it does not require an SD card to boot. The OS and file system live on a central server. Because most of the provisioning happens on a central server I can eventually automate it via scripts.
What is PXE, How does it work?
This is a basic overview of PXE. If you want to dive deeper on PXE we suggest you read out post What is PXE? How does it work?
PXE stands for Preboot Execution Environment. At a high level PXE is a standard for network booting a computer. It uses standard networking protocols to achieve network booting. Specifically IP, UDP, DHCP and TFTP. PXE is typically used in one of two ways:
- Initial bootstrap or provisioning of a network enabled server. In this use case the PXE boot process initializes the system by installing an operating system on local storage. For example, using dd to write a disk image or using a debian preseed installer.
- Disk-less systems which always boot off the network. For example the process we follow in this tutorial.
The diagram below shows the high level flow of the PXE boot process. Understanding the flow will help in the event you need to troubleshoot a boot failure.
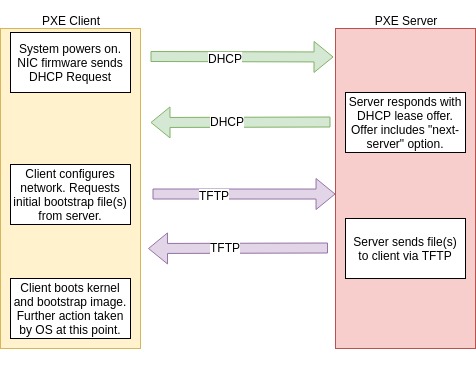
Overview of the PXE flow
- Client powers on, the clients network interface card firmware sends a DHCP request over the network.
- A DHCP server responds with a DHCP lease offer. This lease offer will have an option for the “next-server”. The “next-server” option value is the IP or name of the server the client will download its initial boot files from. The next-server field is know as option 66 in the DHCP protocol.
- The client downloads files via TFTP from the host specified in the next-server field of the lease. Typically the files are a kernel and initrd image. However it could be something else. For example it could chain load a network boot loader or another PXE client like IPXE.
- The client boots the downloaded files and starts its boot strap process.
- At this point the client could start an OS installation or boot as a disk-less system.
Inventory
- Quantity 2 – Raspberry Pi 4s. I bought the CanaKit with 4GB of RAM.
- A network switch or cable to connect the two Pi 4s.
- HDMI cable (comes with CanaKit), monitor and USB keyboard for debugging.
- A micro SD card. Again one comes with the CanaKit.
Assumptions
- You have an existing network with Internet access that can be used to install packages on your Pi 4.
- You have a dedicated or stand alone network for running the PXE boot client and server. This can be a network switch or it can simply be an ethernet cable between the two Raspberry Pis.
- You will use the following network IP addresses for your Raspberry Pis, PXE Server: 192.168.2.100, PXE Client will get an IP address via DHCP. Your subnet mask on the server should be a /24 (255.255.255.0). You can tweak this however you want, but all the documentation in the tutorial assumes these addresses.
Phase 1 – PXE Boot Client Configuration
The Raspberry Pi 4 has an EEPROM. The EEPROM is capable of network booting. Unfortunately the only way I have found to configure network booting is from Linux. Hence you must boot the system at least once with an SD card to configure it.
Install Raspbian on an SD card and install needed tools
Let’s start configuring your client system for netboot. This is the Raspberry Pi that will eventually boot without a micro SD card installed.
- Download Raspbian Lite. For this tutorial I used the Buster release. Link to direct download. Link to the torrent.
- Copy the Buster image onto an SD card. I suggest reading this page for instructions on how to do this. I used the dd command below, replacing sdX with my SD card device. Warning! This will overwrite data on the device specified. Triple check you are writing to the SD card and not your laptop drive!
- If your SD card already has a partition table on it your system might auto mount it on insertion. Un-mount or eject any volumes mounted from the micro SD card. Then use the dd command below to copy the image to your micro SD card. The dd command takes a few minutes to complete on my laptop.
sudo dd if=2019-09-26-raspbian-buster-lite.img of=/dev/sdX bs=4M- Put the SD card in your client Raspberry Pi 4 and boot it. Using the lite version of raspbian give you a text console only. If you want a graphical console you can use the full version and it should work. I have not tested this workflow with the full version.
- Log in via the console using the default login: pi/raspberry
- Connect your Raspberry Pi to the internet via an ethernet cable.
- Update the Raspbian OS via apt-get and install the rpi-config program:
sudo apt-get update
sudo apt-get full-upgrade
sudo apt-get install rpi-eeprom
Configure the Rasperry Pi 4 bootloader to PXE boot
Next lets examine your boot loader configuration using this command:
vcgencmd bootloader_configHere is the output on my fresh out of the box Raspberry Pi 4:
pi@raspberrypi:~ $ vcgencmd bootloader_config
 BOOT_UART=0
 WAKE_ON_GPIO=1
 POWER_OFF_ON_HALT=0
 FREEZE_VERSION=0
We need to modify the boot loader config to boot off the network using the BOOT_ORDER parameter. To do that we must extract it from the EEPROM image. Once extracted, make our modifications to enable PXE boot. Finally install it back into the boot loader.
We do that with these steps:
- Go to the directory where the bootloader images are stored:
cd /lib/firmware/raspberrypi/bootloader/beta/- Make a copy of the latest firmware image file. In my case it was
pieeprom-2019-11-18.bin:
cp pieeprom-2019-11-18.bin new-pieeprom.bin- Extract the config from the eeprom image
rpi-eeprom-config new-pieeprom.bin > bootconf.txt- In bootconf.txt, change the BOOT_ORDER variable to
BOOT_ORDER=0x21. In my case it had defaulted toBOOT_ORDER=0x1.0X1means only boot from SD card.0x21means attempt SD card boot first, then network boot. See this Raspberry Pi Bootloader page for more details on the values and what they control. - Now save the new bootconf.txt file to the firmware image we copied earlier:
rpi-eeprom-config --out netboot-pieeprom.bin --config bootconf.txt new-pieeprom.bin- Now install the new boot loader:
sudo rpi-eeprom-update -d -f ./netboot-pieeprom.bin- If you get an error with the above command, double check that your apt-get full-upgrade completed successfully.
Disabling automatic rpi-eeprom-update
As pointed out by a reddit user, rpi-update will update itself by default. The rpi-eeprom-update job does this. Considering that we are using beta features, a firmware update could disable PXE boot in the eeprom. You can disable automatic updates by masking the rpi-eeprom-update via systemctl. You can manually update the eeprom by running rpi-eeprom-update when desired. See the Raspberry Pi docs on rpi-eeprom-update for more details.
sudo systemctl mask rpi-eeprom-updatePhase 1 Conclusion
Congratulations! We are half way to first net boot. Our Raspberry Pi net boot client is configured for PXE boot. Before you shut down the Pi 4 please make note of ethernet interface MAC address. You can do this by running ip addr show eth0 and copying the value from the link/ether field. In my case it was link/ether dc:a6:32:1c:6a:2a.
Unplug and put aside your Raspberry Pi PXE boot client for now. We are moving on to configuring the server. Now is also a good time to remove the SD card. It is no longer needed now that the Pi will net boot.
Phase 2 – Raspberry Pi PXE Boot Server Configuration
If you completed the client configuration you can use the same SD card for the server or use a second one. For example I use two different micro SD cards in case I need to boot the client off micro SD for debugging purposes.
Are you are using two micro SD cards? Make sure install Raspbian on the second card as well. Follow the the instructions earlier in the tutorial. Then boot your server off the SD card. Some of the initial server configuration steps will be familiar. Boot the server connected to an Internet connection. We need the Internet connection to update and install packages. Later in this phase we will remove it from the Internet and plug directly into the other Raspberry Pi.
Update Raspbian and install rpi-eeprom, rsync and dnsmasq
Update the Raspbian OS via apt-get and install the rpi-config program. Note this step can take a while. Time will vary based on the speed of your Internet connection.
sudo apt-get update
sudo apt-get full-upgrade
sudo apt-get install rpi-eeprom
Install rsync and dnsmasq. We will use rsync to make a copy of the base os and we will use dnsmasq as the DHCP and TFTP server. NFS will be used expose the root file system to the client.
sudo apt-get install rsync dnsmasq nfs-kernel-serverCreate the NFS, tftp boot directories and create our base netboot filesystem
Make the NFS and tftpboot directories. The /nfs/client1 directory will be the root of the file system for your client Raspberry Pi. If you add more Pis you will need to add more client directories. The /tftpboot directory will be used by all your netbooting Pis. It contains the bootloader and files needed to boot the system.
sudo mkdir -p /nfs/client1
sudo mkdir -p /tftpboot
sudo chmod 777 /tftpboot
Copy your Pi’s OS filesystem in the /nfs/client1 directory. We are going to exclude some files from the rsync. This is a preventative measure in case you run this command again after configuring the network and dnsmasq. This command takes some time due to the IO characteristics of SD cards. They are slow 🙂
sudo rsync -xa --progress --exclude /nfs/client1 \
    --exclude /etc/systemd/network/10-eth0.netdev \
    --exclude /etc/systemd/network/11-eth0.network \
    --exclude /etc/dnsmasq.conf \
    / /nfs/client1
Now we use chroot to change root into that directory. But before we chroot we need to bind mount the required virtual filesystems into the base client directory.
Once in the chroot we delete server SSH keys. Next we reconfigure the openssh server package which will regenerate the keys. Additionally we enable the ssh server so we can remotely login when the client comes online.
cd /nfs/client1
sudo mount --bind /dev dev
sudo mount --bind /sys sys
sudo mount --bind /proc proc
sudo chroot . rm /etc/ssh/ssh_host_*
sudo chroot . dpkg-reconfigure openssh-server
sudo chroot . systemctl enable ssh
sudo umount dev sys proc
Configure the PXE server to use a static IP
Our PXE server is a DHCP server. Meaning it assigns IP addresses and network configuration to clients which request them. In this case our Raspberry Pi PXE boot client. If we do not want the PXE boot server itself to run the DHCP client. Therefore we should disable the DHCP client. Let’s do that now. Create a new systemd file to disable the DHCP client on eth0. The path for the file we wish to create is /etc/systemd/network/10-eth0.netdev. Its contents should be:
[Match]
Name=eth0
[Network]
DHCP=no
Create the /etc/systemd/network/11-eth0.network file with the following contents. Please note that I am specifying 192.168.2.1 as the DNS server and gateway address. In this tutorial I do not have a gateway or DNS server at that address. Further, none are needed for this tutorial. I have them there as a place holder so if I want to connect this system I can drop a router on the network at that address. You can probably leave DNS and Gateway out if you prefer.
[Match]
Name=eth0

[Network]
Address=192.168.2.100/24
DNS=192.168.2.1
Gateway=192.168.2.1
No we are going to disable to the dhcp client service dhcpcd that is enabled by default on raspbian. Please pay extra careful attention to the fact that is “dhcpcd” and not “dhcpd”. The first is a DHCP client, the second a server.
sudo systemctl stop dhcpcd
sudo systemctl disable dhcpcd
Configure dnsmasq for PXE boot
This step configures dnsmasq to support our PXE boot. Replace your /etc/dnsmasq.conf file with the following contents:
interface=eth0
no-hosts
dhcp-range=192.168.2.101,192.168.2.200,12h
log-dhcp
enable-tftp
tftp-root=/tftpboot
pxe-service=0,"Raspberry Pi Boot"
Next we copy the boot files from our /boot directory into the tftpboot directory.
sudo cp -r /boot/* /tftpboot/Enable systemd-networkd and dnsmasq. Restart dnsmasq to confirm the config is valid. Finally reboot and ensure the Pi comes up with the network configured properly.
sudo systemctl enable systemd-networkd
sudo systemctl enable dnsmasq.service
sudo systemctl restart dnsmasq.service
sudo reboot
Now we must update the cmdline.txt file in /tftpboot. This file contains the kernel parameters that are passed to our client Raspberry Pi at boot time. Edit /tftpboot/cmdline.txt replace it with:
console=serial0,115200 console=tty1 root=/dev/nfs
nfsroot=192.168.2.100:/nfs/client1,vers=3 rw ip=dhcp rootwait elevator=deadline
Configure the NFS exports on the PXE boot server
This steps configures the exports. Exports are file systems that are being shared or exported via NFS. To do this we must configure the /etc/exports service and the restart the NFS related services.
The contents of /etc/exports should be as follows.
/nfs/client1 *(rw,sync,no_subtree_check,no_root_squash)
/tftpboot *(rw,sync,no_subtree_check,no_root_squash)
Configure the /etc/fstab to mount via NFS
We are almost done! One last step to modify the /etc/fstab file in our client’s file system. This will tell the client to mount its root volume off the NFS server on our PXE Boot server Raspberry Pi. Put the following into /nfs/client1/etc/fstab.
proc       /proc        proc     defaults    0    0
192.168.2.100:/tftpboot /boot nfs defaults,vers=3 0 0
Finally enable and restart NFS related services.
sudo systemctl enable rpcbind
sudo systemctl restart rpcbind
sudo systemctl enable nfs-kernel-server
sudo systemctl restart nfs-kernel-server
Now do one last reboot on the server for good measure. Take a look at the system logs and systemctl statuses to see if everything started correctly.
Complete. Does it work?
Nice work getting through the tutorial. Now is the final test. Plug your client Raspberry Pi into the network or directly to the server via ethernet. Now connect a keyboard and LCD screen to your client Raspberry Pi. Power on and wait. Hopefully you will see the following after a few moments!
Raspberry Pi PXE Troubleshooting Guide
Hopefully you are up and running. But if you are experiencing problems this section can help you debug your kit. The trickiest part of troubleshooting this setup is that the graphical console on the client emits no information until the OS kernel starts booting. As a result I had to do all troubleshooting on the server side.
It is possible the client does emit some useful information via serial console. But I have not tried because I don’t have the right equipment today.
Troubleshooting Tools
- Check dnsmasq is running
sudo systemctl status dnsmasq.service- check nfs server and rpc bind are running
sudo systemctl status rpcbind.service
sudo systemctl status nfs-mountd.service- See stats from your NFS server. Useful for seeing if the NFS client has connected
sudo nfsstat- Tail the daemon log file
sudo tail -f /var/log/daemon.log- Use tcpdump to packet trace.
tcpdump -n -i eth0 - Use tcpdump filters to narrow down your trace. For example to only see DHCP traffic (port 67) use the following command.
tcpdump -n -i eth0 port 67What stage is the failure?
The key to troubleshooting PXE boot problems is figuring out where in the workflow it is failing. Hence if you are new to PXE, re-reading the earlier section of this post (What is PXE, How does it work?) will help.
The first question you need to answer is: “What stage is the failure in?” It could be in the following stages:
- Bootloader DHCP stage.
- Bootloader TFTP stage.
- Linux/OS NFS mount stage.
DHCP Stage
If your client is properly configured it should be making a DHCP request at boot time. Lets see if DHCP is working.
- Tail the server daemon.log file and power on your client Pi. See “Tailing the daemon log file” below.
- Do you see dnsmasq log messages indicating it is serving dhcp requests to your client Pi? If yes, you know that the DHCP server is working, the client is properly configured and the network between the two Pis is functional.
- If you don’t see dnsmasq messages about DHCP, your next step is to probably packet trace using tcpdump. Run tcpdump on the server. Do you see DHCP traffic coming from the client. If yes, is the server responding?
TFTP Stage
- Tail the server deamon.log and look for dnsmasq messages related to TFTP. All client requests should be logged.
- If DHCP is working but TFTP is not, you can probably assume the network is OK. Otherwise DHCP would not work. Next step is to double check your TFTP configuration and permissions on the /tftproot directory.
- Try plugging in your laptop and using a tftp client to connect. What happens?
NFS Stage
- Check
/var/log/daemon.log/var/log/syslogand/var/log/messagesfor clues. - Did you restart the nfs and rpc-bind services after updating
/etc/exports? - Double check your
/etc/exportsfile for typos.
If all else fails
Try again, the network boot is a beta feature and could have bugs. For example, reports on the Raspberry Pi site indicate a reboot can be required if it not working.
Room for improvement
This process is hacky. In other words, plenty of room for improvement. If time permits I will implement the following improvements.
- Stop copying the files for clients off the server root file system. It is bound to cause problems at some point. For example if you make a server specific configuration change and then re-sync the files you end up with that change on the clients. Creating a pristine file system tarball and using it as your base for new client directories is a better solution.
- Experiment with the Packer Arm Image Builder. Using Packer is a much cleaner solution. As a result of using Packer, it will be much easier to automate image builds.
- Creating a small pristine base image for the client. Using debootstrap or multistrap for example. This should result in a smaller base image.
- Make the root file system read-only and configure the client image to use tmpfs for ephemeral writes.
- Improve the security model especially around NFS.
- We currently single client configuration. An automated process for adding and removing clients is cleaner and scales better.
- This workflow results in the clients having the same hostname as the server unless you change it by hand.
- Increase the security of the NFS configuration. Possibly convert to mount the root file system read only.
Feedback
I want to make this guide as thorough as possible. Please provide feedback to this post in the comments. with any feedback. Constructive feedback will be worked into future edits.
Donations and Tips
We provide content like this tutorial free of charge. But people often ask how they can support the site. If you find this tutorial useful and wish to support the site you can donate here. These tips help to pay for hosting costs and time spent writing content.
Make a one-time donation
Your contribution is appreciated.
DonateMake a monthly donation
Your contribution is appreciated.
Donate monthlyMake a yearly donation
Your contribution is appreciated.
Donate yearlySuggested Products
- Raspberry Pi 4 bare board
- Raspberry Pi 4 CanaKit, a complete kit with power, SD card, etc…

Credits
The following resources were instrumental in this project.
- Raspberry Pi Docs – Boot Loader Config and Net Boot Tutorial
- Raspberry Pi Forums
- Hackaday – Network booting the Pi 4
Update Log
- Added instructions on disabling the DHCP client via systemctl. – Dec 4th 2019
- Found an error in the systemd network file. Gateway was in the wrong stanza. – Dec 4th 2019
- Fixed typos where raspbian was mis-spelled raspian. – Dec 1st 2019
- Added notes on disabling rpi-eeprom-update to prevent automatic updates. – Dec 1st 2019
- Readability improvements. – Dec 1st 2019
This is a great tutorial!! I had one question though. Have you tried to PXE boot a Pi 4 client with the PiServer tool? It works on Pi 3 and to some extent Pi 2 ( It’s very slow and you still need an SD card with bootcode.bin on it) . I’m trying to get it to work with Pi 4, but my server doesn’t seem to be detecting my client. Thanks.
I have not tried it. Looks interesting though. I will try to check it out in the next couple of weeks. If I had to guess what your problem is I would wager that Pi boot is using the dhcp/pxe client identifier string to decide if it should net boot it and it probably does not have the pi 4 identifier string in its configuration.
If you change the /etc/dnsmasq.conf at the bottom, and add:
dhcp-mac=set:client_is_a_rpi4,DC:A6:32:*:*:*
just aftert the existing one, and you have the PI4 set up with the beta netboot firmware, and you have images after 9/26/2019, it works very well.
Great work on the write up; I’m looking forward to working on packer for image builds now that I got PXE working with your guide. I think it’s worth noting the DHCP options the pi4 requires to boot successfully. This is gave me some hangs ups trying to use a different DHCP server, but a packet capture revealed some things I was missing. The clients BOOTREQUEST was also requesting options 128 – 135 but these don’t appear necessary. Found this on a RPF forum thread and wanted to include this here for your readers.
Option 43 (vendor-encapsulation) – important – needs to be set to colon separated hex values 6:1:3:a:4:0:50:58:45:9:14:0:0:11:52:61:73:70:62:65:72:72:79:20:50:69:20:42:6f:6f:74:ff or string value “ Raspberry Pi Boot”
Option 60 (vendor-class-identifier) – needs to be set to string value “PXEClient”
Option 66 (tftp-server) – IP address for tftp server
Option 67 (boot-file) – set to /path_to/bootcode.bin
Thanks for the notes. Yes, in the dnsmasq.conf its not obvious what DHCP options the line ‘pxe-service=0,”Raspberry Pi Boot”‘ translate to in other DHCP servers. I might write a more generic DHCP guide that for this that can be used to make configurations for other servers.
With regards to the “PXEClient” for option 60, I believe that is only needed if you want to specify a different configuration based on the identifier. In this case I was trying to keep it as simple as possible. So I built the config with the assumption that all hosts would get a DHCP lease that includes the PXE boot options.
What version of Raspberry Pi are you using? I tested it this on 4 which should not require the bootcode.bin file if I remember correctly
I’m using a Pi 4. And it appears you are correct; I deactivated the boot-file from my DHCP Server config and it it appears to boot fine.
I Just added another node and Im confused how I would point another client to a different directory in the /tftpboot/cmdline.txt config. Both boot and mount the same rootfs as is, and it’s definitely a split brain.
Hi Randall,
This should be possible by creating a directory in /tftpboot that is named after the Pi’s serial number and putting a custom cmdline.txt in that directory. On boot the Pi will look for that directory and if it exists it will download files from there. I am not near my computer at the moment so I can’t fully test. But I have played around with it in the past and it should work.
Playing around with it I got it working; thanks for the pointer. For those wondering you can get the serial as follows:
pi@raspberrypi:~ $ cat /proc/cpuinfo | grep Serial
Serial : 10000000ba8c150a
When you create a directory its going to expect the name to be the last 8 characters of the serial.
pi@rpi4:/tftpboot/ba8c150a $ pwd
/tftpboot/ba8c150a
I found it expects all of the files to be present including the kernel.img. I’m going to try and figure a work around for this; ideally i’d have them all sharing 1 kernel image for making updates easier but I should be able to work around with scripts.
You should be able to sym link them to a central directory. Thanks for sharing.
Hello,
I’m trying to boot a few rpi’s from the same folder on server and it boots without any problem but when Xorg and chromium starts on both of them it crash. Can I use one folder for bunch of rpi’s or it will crash because of file overwriting? I don’t want to waste space on server and create multiple copies of the same image.
Hi Maciej, the intent is one folder per host. Most programs do not expect to be running in an environment where multiple instances or hosts are sharing the file system.
Am, I able to perform all this processo by using wi-fi connection?
Hi Ken, very detailed blog post and write-up. I noticed that your original driving force for documenting this method was to run Kubernetes on your Raspberry Pi cluster. You haven’t mentioned it since in the post or on your recent articles, so I wondered how you got around the issue with Docker (overlayfs) not working with NFS?
I ran into this several years ago with the RPi3. https://blog.alexellis.io/the-state-of-netbooting-raspberry-pi/
At the time, the community was suggesting an iSCSI target.
Feel free to email me [email protected] if you’d like to talk more.
Hi Alex, I ended up shelving this project for a while. I had gotten k3s up and running but not on NFS root yet. My initial thought was to see if I could use tmpfs with really small container images. I realize RPI is not a great platform for that given the ram constraints but figured I would try it. ISCSI would be another option might be NBD but I haven’t tried it.
Thanks for leaving these breadcrumbs regarding iSCSI! I gave it a go, and I can confirm it works for hosting Docker containers on a Raspberry Pi! I wrote it up on my blog, although I imagine the steps aren’t that surprising given your post here.
https://jacobrsnyder.com/2021/01/20/network-booting-a-raspberry-pi-with-docker-support/
Looking to PXEBoot for RPi4 project at work. Can the boot file directory be some machine name base vs the serial number?
IE… PublicKiosk1, PublicKiosk2. That way when they fail I just load the initial configuration and settings to convert it from a SDCard operation to PXEBoot. Would need no server side changes to account for the new device replacing the old.
You mention setting up a client from a downloaded image. Here are my notes if you’d like to incorporate them. /srv/rpi/diskless is my nfs export base.
unzip $IMG.zip
kpartx -av $IMG.img
mkdir -p p1
mount /dev/mapper/loop0p1 p1
mkdir -p p2
mount /dev/mapper/loop0p2 p2
mkdir /srv/rpi/diskless/$NEWHOST
cp -a p2/. /srv/rpi/diskless/$NEWHOST/.
cp -a p1/. /srv/rpi/diskless/$NEWHOST/boot/.
umount p1
umount p2
kpartx -d $IMG.img
This is a minimal-ish setup for a raspian-lite image (July ’20)
cd /srv/rpi/diskless/$NEWHOST/
# Make it ssh
touch boot/ssh
# Don’t try to mount sd stuff
sed -i /UUID/d etc/fstab
# nfsboot please
echo “console=serial0,115200 console=tty root=/dev/nfs nfsroot=$NFS:/srv/rpi/diskless/$NEWHOST,vers=3 rw ip=dhcp rootwait elevator=deadline” > boot/cmdline.txt
# don’t look for the SD card all the time
echo dtparam=sd_poll_once=on >> boot/config.txt
# Don’t resize or try to add swap
rm -fv etc/init.d/resize2fs_once etc/rc*.d/*resize2fs_once
rm -fv etc/init.d/dphys-swapfile etc/rc*.d/*dphys-swapfile
im trying to copy the eeprom config to the bootconf.txt file and even with sudo im getting a permissions error. I know this tutorial was run off of a fresh rasbian lite install but im running this on a pre-imaged, updated, and upgraded pi we use here at work. I know the username and password for root but i dont know if that would even matter since sudo doesnt allow me to pull out the config file. Any idea what im doing wrong?
when i boot up the client im getting see the tftp ip as 0.0.0.0. The boot sequence at the bottom will pull an IP address from our dhcp server (windows) and pull in the address for that dhcp server but then it fails with Net_Boot failed insert sd card. ive tried this with both dhcp turned on and off at the PXE_server pi level as well as changing the dhcp range in that one step above.